Articles > How-To Guides: Step-by-Step Instructions for Building Model Kits
Sanding and painting model kits is of utmost importance in achieving a high-quality final product. These techniques allow modelers to enhance the overall appearance of their creations by smoothing out imperfections, adding color, and bringing the models to life with intricate details.
Sanding plays a crucial role in achieving a flawless finish. When assembling model kits, there are often visible seams or imperfections that can detract from the overall aesthetics. By sanding the surface, these flaws can be leveled out and hidden, resulting in a uniform and seamless appearance. This step also helps to ensure that paint adheres smoothly to the surface, preventing any unwanted brush strokes or unevenness.
Painting adds color and detail to the model, allowing it to closely resemble the real-life subject it represents. By carefully choosing paint colors and techniques, modelers can enhance the authenticity and realism of their creations. Additionally, painting allows for creative expression, as subtle shading and highlighting can be employed to add depth and texture to the model.
Before painting, it is essential to prime and basecoat the model. Priming prepares the surface by providing a suitable base for paint to adhere to, ensuring better durability and a smooth finish. Basecoating establishes a solid foundation color upon which additional layers of paint can be applied. It is crucial to choose the right type of paint, whether acrylic or enamel, depending on the desired effect and the materials being used.
In conclusion, sanding and painting techniques are indispensable in the world of model kits. These processes not only smooth out imperfections but also add color, detail, and realism to the models. By diligently following these steps and selecting the appropriate paints, modelers can achieve a truly remarkable final product.
Introduction:
Before starting any project, it is crucial to have a clear understanding of the materials needed to successfully complete it. This ensures that you are adequately prepared and can efficiently carry out the tasks at hand. Whether it's a DIY home improvement project, a crafting venture, or even a professional undertaking, having a comprehensive list of materials is essential. In the following headings, we will explore the significance of materials in different contexts and provide examples of the types of materials you may require for various projects. So, let's dive in and discover the key materials that can make a project a resounding success.
When it comes to sanding tools, different sanding materials are used to ensure optimal results. One popular option is sanding sponges, which offer several benefits. These sponges are made from a variety of materials, such as aluminum oxide, silicon carbide, and diamond.
Aluminum oxide sanding sponges are durable and versatile. They are ideal for sanding wood, metal, and plastic surfaces, providing a smooth and polished finish. Silicon carbide sanding sponges, on the other hand, are known for their aggressive cutting action. They are commonly used for sanding harder materials like stone and concrete. Diamond sanding sponges are the most abrasive and are primarily used for tasks that require heavy material removal, such as grinding down uneven surfaces or removing paint.
To attach these sanding materials to the sponge or fabric backing, manufacturers use different methods. Some sanding sponges have adhesive backing, allowing the sanding materials to stick directly onto the sponge. Others have hook-and-loop attachments, which make it easier to swap out different grits of sandpaper.
Two well-known manufacturers, Tamiya and Godhand, offer a variety of sanding tools with foam sponge or fabric backing options. Tamiya offers a range of sanding sticks with foam sponge backing, ideal for precise sanding in narrow spaces. Godhand provides sanding pads with fabric backing that offer flexibility and durability, making them perfect for sanding curved or contoured surfaces.
Another important technique in sanding is wet sanding, which involves using water or a lubricant during the process. Wet sanding offers several advantages, including reduced heat buildup, longer sandpaper life, a smoother surface finish, and less dust. This technique is commonly used in automotive and woodworking applications to achieve high-quality results.
In conclusion, understanding different sanding materials and their benefits is crucial for achieving the desired finish. From sanding sponges with aluminum oxide or silicon carbide to diamond options, these materials offer varying degrees of aggressiveness and versatility. They can be attached to sanding tools using adhesive backing or hook-and-loop systems. Manufacturers like Tamiya and Godhand offer a wide range of options with different backing materials. Finally, wet sanding is an advantageous technique that reduces heat, increases sandpaper lifespan, provides a smoother surface, and minimizes dust during sanding.
Sandpaper is an essential tool for sanding and filing in model building, as it allows for precise shaping and finishing of various materials. Its uses are manifold, ranging from removing imperfections and excess material to achieving smooth and polished surfaces.
One of the advantages of using sandpaper is its versatility. It can be used on different materials such as wood, plastic, metal, and even glass, making it ideal for model building where different components often require different finishes.
When choosing the right grit for sanding, it is important to consider the material and the desired outcome. Finer grits, such as 220 or higher, are suitable for finishing and polishing, while coarser grits, like 80 or 120, are more suitable for initial shaping or removing larger imperfections. Using a systematic progression of grits, starting with a coarser grit and gradually moving to finer ones, allows for a more uniform and smoother finish.
Wet sanding is another technique that can be employed in model building. It involves using water or a lubricant to reduce friction and prevent clogging of sandpaper, resulting in a more even and efficient sanding process. Wet sanding is particularly useful when working with materials that tend to generate a lot of heat, such as certain plastics.
In addition to traditional sandpaper sheets, sanding sponges can also be beneficial. They are flexible and easily moldable, making them ideal for sanding curved or irregular surfaces. Sanding sponges come in various grits and can be used wet or dry, further enhancing their versatility.
In conclusion, the uses and advantages of sandpaper in model building are numerous. By choosing the right grit, employing a systematic progression, considering wet sanding, and utilizing sanding sponges, model builders can achieve precise shaping and flawless finishes on a variety of materials.
Introduction:
A sanding block is a versatile tool used in various woodworking and home improvement projects. Its primary function is to assist in the sanding and smoothing of surfaces, allowing for a more even and professional finish. Made from a durable material such as wood or foam, sanding blocks are often preferred over sandpaper alone due to their ergonomic design and ability to evenly distribute pressure. Whether you are working on a small DIY project or a larger renovation, a sanding block can be a valuable asset in achieving a smooth and polished result. This article will explore the benefits of using a sanding block, how to choose the right one for your specific needs, and provide some practical tips for efficient and effective sanding techniques.
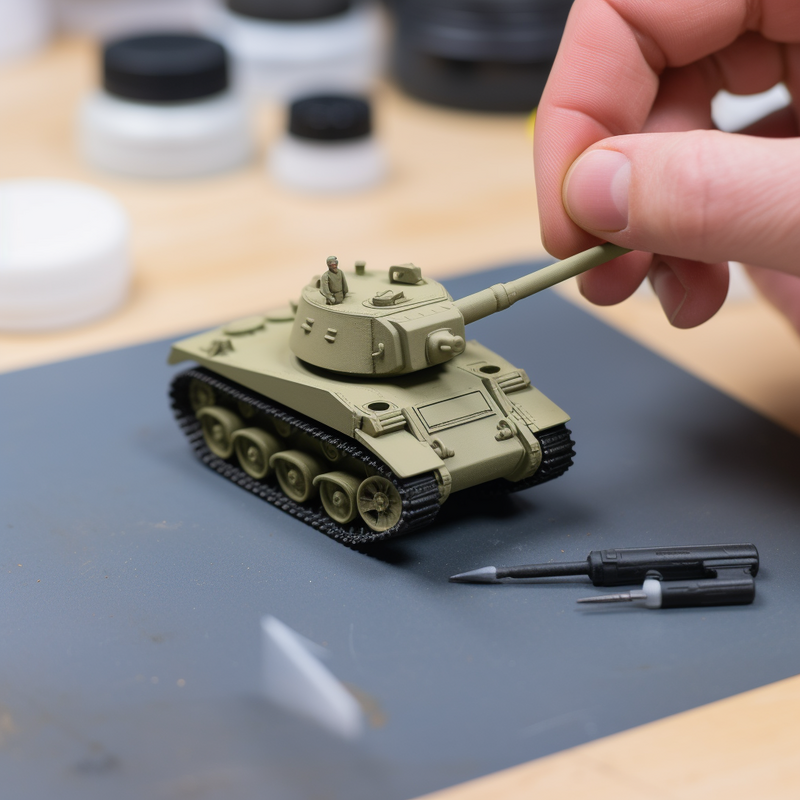
When it comes to painting plastic models, there are several essential tools and supplies that you will need. First and foremost, the type of paint is crucial. The two most commonly used types are acrylics and enamels. Acrylic paints dry quickly and are water-based, making cleanup easy. Enamels, on the other hand, take longer to dry but provide a smooth and durable finish.
Next, you will need a variety of brush sizes. Different brush sizes are used for different areas of the model. Smaller brushes are necessary for painting intricate details, while larger brushes are used for larger surfaces. It is important to have a range of brush sizes to ensure accurate and efficient painting.
When applying paint to plastic models, it is essential to work in thin layers. Applying too much paint at once can result in a thick, uneven finish that obscures details. Thin layers allow for precise and controlled application, producing a more realistic and professional result.
Lastly, many plastic models come with decals that add detail and authenticity. These decals should be carefully applied with precision. To do so, it is recommended to use water to wet the decal, slide it off the paper backing, and position it on the model. Once applied, press down gently with a damp cloth to remove any air bubbles.
In conclusion, painting materials for plastic models include essential tools such as acrylic and enamel paints, a range of brush sizes, the importance of thin layers, and the use of decals. By utilizing the correct materials and techniques, you can achieve impressive results when painting your plastic models.
Acrylic paint is a versatile medium that can be used for a variety of applications, from canvas paintings to craft projects. Achieving a smooth finish when brush painting with acrylics requires some attention to detail and the use of certain techniques.
One common issue when using acrylic paint is the granular appearance that can occur if the paint is not properly mixed or applied. To avoid this, make sure to thoroughly mix the paint before using it, using a palette knife or stir stick to blend the color until it is smooth and consistent. This will help to eliminate any clumps or granules that can create an uneven texture.
Another challenge with acrylic paint is its quick drying time, which can make it difficult to achieve a smooth finish. To prevent this, avoid adding too much water or thinners to the paint, as this can cause it to dry too quickly and create a textured surface. Instead, use a dry brush with a sufficient amount of paint. This will allow you to work with the paint for longer periods of time, allowing for smoother brush strokes and better blending.
Finally, it is important to work in thin layers when brush painting with acrylics. Applying thick layers of paint can also lead to a granular appearance. By using thin layers and allowing each layer to dry completely before applying the next, you can build up smooth, even coverage.
In conclusion, achieving a smooth finish when brush painting with acrylics requires proper mixing of the paint, avoiding excessive thinning, and working in thin layers. By following these tips and techniques, you can create beautiful, professional-looking artwork with acrylics.
Enamel paint is a type of paint that is commonly used for its durability and glossy finish on various surfaces. It is known for its smooth texture and high sheen, making it a popular choice for furniture, trims, and metal surfaces. One of the key properties of enamel paint is its thickness; it typically has a thicker consistency compared to other types of paint, which allows for better coverage and a more even finish.
Enamel paint undergoes a curing process, where it forms a hard, protective layer once it dries. This process helps enhance its durability and makes it resistant to scratches and chipping. The solvent used in enamel paint is usually mineral spirits or petroleum-based, which helps the paint flow smoothly and dries at a moderate speed.
Enamel paint is known to have excellent color hold, meaning that it retains its color vibrancy and sheen for a long time. It is available in a wide range of colors, allowing for versatile color selection to suit any project or design. Moreover, enamel paint is highly durable and can withstand harsh weather conditions, making it suitable for both indoor and outdoor applications.
It is important to note that enamel paint can emit toxic fumes during the curing process, which is why proper ventilation is crucial when working with this type of paint. Good ventilation helps in eliminating and reducing the inhalation of harmful fumes, protecting the individuals working with enamel paint from potential health risks.
Enamel paint comes in different finishes, such as high gloss, semi-gloss, and satin. These finishes add to the versatility of enamel paint, allowing for various design options depending on the desired look and feel of the project.
In summary, enamel paint is a popular choice for its properties such as thickness, curing process, solvent, drying speed, color hold, color selection, durability, and finishes. However, it is important to have proper ventilation when working with enamel paint due to its toxicity.
Paint thinner is a chemical solvent that is commonly used in the painting process. Its main purpose is to thin out the consistency of paint, making it easier to apply and work with. Additionally, paint thinner can help to clean brushes, remove paint drips, and facilitate the blending of colors.
There are different types of paint thinner available, and the choice depends on the type of paint being used. For water-based paints, such as acrylics, water is the most commonly used thinner. It is readily available and easily accessible. However, for oil-based paints or enamel paints, a special modeling solvent is needed. This solvent is designed specifically for thinning these types of paint and can be found at art supply stores.
When it comes to thinning paint, the process may vary slightly depending on the type of paint being used. For acrylic paints, water can be added to the paint gradually until the desired consistency is achieved. It is important to add water in small increments, as adding too much can dilute the color and affect the paint's overall opacity.
For enamel or oil-based paints, the special modeling solvent should be added gradually as well. These solvents are specifically formulated to thin the paint without compromising its quality or drying time.
Before applying the thinned paint to the canvas or surface, it is crucial to test it on a blank sheet of paper. This allows painters to evaluate the consistency, color, and overall texture of the paint before committing to their artwork. Testing the paint ensures that any necessary adjustments can be made to achieve the desired results.
In conclusion, paint thinner is an essential tool in the painting process. Different types of paint thinner are used depending on the type of paint being used. Thinning paint involves adding either water or a special modeling solvent to achieve the desired consistency. Testing the mixed paint on a blank sheet of paper is crucial before applying it to the final artwork.
technique to address the issue of the paint taking on a 'granular' appearance:
To address the issue of paint taking on a 'granular' appearance, a paint brush technique known as dry brushing can be applied. Dry brushing involves using a small amount of paint on the brush to create subtle and controlled brush strokes, enhancing texture and details on the surface.
To execute this technique, follow these steps:
1. Dip the tip of the paint brush into the paint, then wipe off excess paint on a paper towel or palette.
2. Lightly brush the paint-loaded brush onto the surface, using short strokes in the direction of the desired texture.
3. Allow the paint to dry completely before applying subsequent layers, if desired.
Proper stirring and ensuring well mixed paint:
To properly stir paint and ensure it is well mixed, follow these guidelines:
1. Start by thoroughly inspecting the paint can to check for any settled paint at the bottom.
2. Use a stirring stick or a paint mixer attachment on a power drill to mix the paint.
3. Insert the stirring stick into the paint can and stir in gentle circular motions, covering the entire bottom and sides of the can.
4. Continue stirring until the paint has a consistent color and texture, free from any lumps or separation.
Preparations before hand painting:
Before hand painting, it is essential to prepare the model properly. This involves the following steps:
1. Clean the model surface by removing any dust, dirt, or grease using a soft brush or a damp cloth.
2. Wash the model with warm soapy water to remove any residual mold release agents or oils. Rinse thoroughly and allow it to dry completely.
3. If necessary, prime the model with a suitable primer to improve the paint adhesion and provide a smooth surface for painting. Follow the instructions provided with the chosen primer.
The importance of acrylic retarder and adequate paint loading:
Acrylic retarder is a medium that slows down the drying time of acrylic paint, giving artists more time to blend colors or work on intricate details. It can be mixed with acrylic paint in a small amount to extend the drying time.
Loading the paint brush with an adequate amount of paint ensures smooth and consistent application. To achieve this, dip the brush into the paint and make sure the bristles are evenly coated but not overloaded. This helps in preventing a 'granular' appearance and allows for better control and coverage.
Keywords: paint brush technique, proper stirring, model preparation, acrylic retarder, adequate paint loading.
Preparing the model kit for painting requires careful attention to detail and thoughtful planning. Before diving into the world of painting, it is essential to ensure that the model kit is clean and free from any dust, fingerprints, or grease. Thoroughly wash the model with warm soapy water and a soft brush, making sure to remove any mold-release agents or residue from the manufacturing process. Once the model is clean and dry, it is time to inspect it for any imperfections or molding seams. Carefully sand down any rough areas or seams using fine-grit sandpaper or specialized modeling files until smooth. This step not only ensures a flawless finish but also aids in the adhesion of paint. Additionally, it is crucial to decide on a color scheme or theme for the model before starting the painting process. Collect reference images or consult historical sources to guide your color choices and achieve a realistic representation. Taking the time to properly prepare the model kit will set the stage for a successful and satisfying painting experience.
Cleaning the surface can be easily done with a gentle cleaning solution and a microfiber cloth. Here is a step-by-step guide on how to effectively clean the surface:
1. Start by removing any loose dirt or debris from the surface. Use a soft brush to gently sweep away any dust, dirt, or crumbs. This will prevent them from scratching the surface during the cleaning process.
2. Next, prepare a cleaning solution by mixing a small amount of a gentle cleaning detergent with warm water. Make sure to use a cleaning solution that is specifically formulated for the surface you are cleaning. For example, use a mild soap for delicate surfaces like glass or wood.
3. Dampen a microfiber cloth with the cleaning solution. Microfiber cloths are perfect for cleaning surfaces as they are soft, non-abrasive, and highly absorbent. They effectively trap dirt and debris without leaving any streaks or scratches.
4. Gently wipe the surface using circular motions. This will help to evenly distribute the cleaning solution and remove any dirt or grime. Be sure to apply gentle pressure to avoid damaging the surface.
5. Rinse the cloth frequently in clean water to remove any dirt and soap residue. This will prevent the cloth from spreading any dirt or grime back onto the surface.
6. Once the surface is clean, allow it to air dry naturally. This will prevent any water spots or streaks from forming.
Cleaning the surface is a simple task that can be accomplished with a gentle cleaning solution and a microfiber cloth. By following these instructions, you can effectively remove dirt and grime while maintaining the integrity of the surface.
Introduction:
When it comes to cleaning surfaces, using warm water and paper towels is a convenient and efficient method to remove dirt and debris. This uncomplicated technique can be applied to a multitude of surfaces, be it household items, electronics, or even vehicles. The combination of warm water's cleaning power and the versatility of paper towels allows for an effective and simple cleaning process that ensures a clean and dirt-free surface. Whether you're tackling small spills, dust, or general grime, this straightforward approach proves to be a practical solution for maintaining cleanliness and hygiene. Let's explore the benefits and steps involved in using warm water and paper towels to eliminate any dirt or debris effectively.
Sanding the surface is an essential step in many painting or refinishing projects, as it helps create a smooth and even surface for better adhesion of paint or coatings. Wet sanding, a technique that involves using water to lubricate the sandpaper, offers several advantages compared to dry sanding.
Firstly, wet sanding reduces heat buildup, which can occur during dry sanding and potentially damage the surface being worked on. The water acts as a coolant, keeping the surface and sandpaper cooler, which also prevents clogging of the sandpaper.
Furthermore, wet sanding also extends the life of the sandpaper. The water helps to flush away the debris and prevents particles from becoming embedded in the sandpaper, thereby maintaining its effectiveness for a longer period.
In addition, wet sanding results in a smoother surface finish. The water acts as a lubricant, allowing the sandpaper to glide smoothly over the surface, minimizing scratches or imperfections. This is particularly important when working on delicate surfaces or when a high-quality finish is desired.
Lastly, wet sanding produces less dust compared to dry sanding. The water traps the dust particles and prevents them from becoming airborne, making the process cleaner and healthier.
To make sanding contoured or irregular surfaces easier, sanding sponges are highly recommended. These sponges are flexible and can conform to the shape of the surface, allowing for better control and more even sanding. They are great for reaching into tight spaces or crevices that standard sandpaper cannot access.
In conclusion, wet sanding with sanding sponges offers numerous benefits, including reduced heat buildup, longer sandpaper life, a smoother surface finish, and less dust. This technique is particularly useful for achieving professional-looking results and is a valuable skill to master for any DIY or refinishing project.
When it comes to model building, achieving a smooth and polished finish is of utmost importance. One tool that plays a critical role in this process is fine-grit sandpaper. With its ability to smooth out any imperfections on the surface, it is an essential tool that model builders should not overlook.
Imperfections can be caused by various factors such as rough edges, uneven surfaces, or visible seams. These imperfections can ruin the overall appearance of the model and detract from the fine details and intricacies that the builder has put so much effort into. This is where fine-grit sandpaper comes into play.
Fine-grit sandpaper, with its small and densely packed abrasive particles, is perfect for refining the surface of the model. It progressively and effectively removes any imperfections left by coarser grits of sandpaper. By using fine-grit sandpaper, the model builder can ensure a smooth and flawless surface that will enhance the overall appearance of the model.
The refining process with finer grits of sandpaper goes beyond simply eliminating imperfections. It also helps to create a polished finish, giving the model a professional and high-quality look. The smooth surface achieved by using fine-grit sandpaper allows paint and other finishing materials to adhere evenly, resulting in a more aesthetically pleasing final product.
In conclusion, the use of fine-grit sandpaper in model building is crucial for achieving a smooth finish. It eliminates imperfections and progressively refines the surface created by coarser grits, ensuring a polished look. By employing fine-grit sandpaper, model builders can elevate the quality of their work and create visually stunning models that showcase their craftsmanship.
 Author: Decentralized User