Articles > How-To Guides: Step-by-Step Instructions for Building Model Kits
The brief overview of the project aims to provide readers with a concise understanding of the project's key features, objectives, and scope. This overview will highlight the main purpose of the project, the target audience it aims to serve, and the expected outcomes or deliverables. It will also briefly mention any relevant background information or context surrounding the project. The goal of this brief overview is to give readers a comprehensive yet concise idea of what the project entails, setting the stage for the subsequent headings and sections that will delve deeper into the project's details and progress.
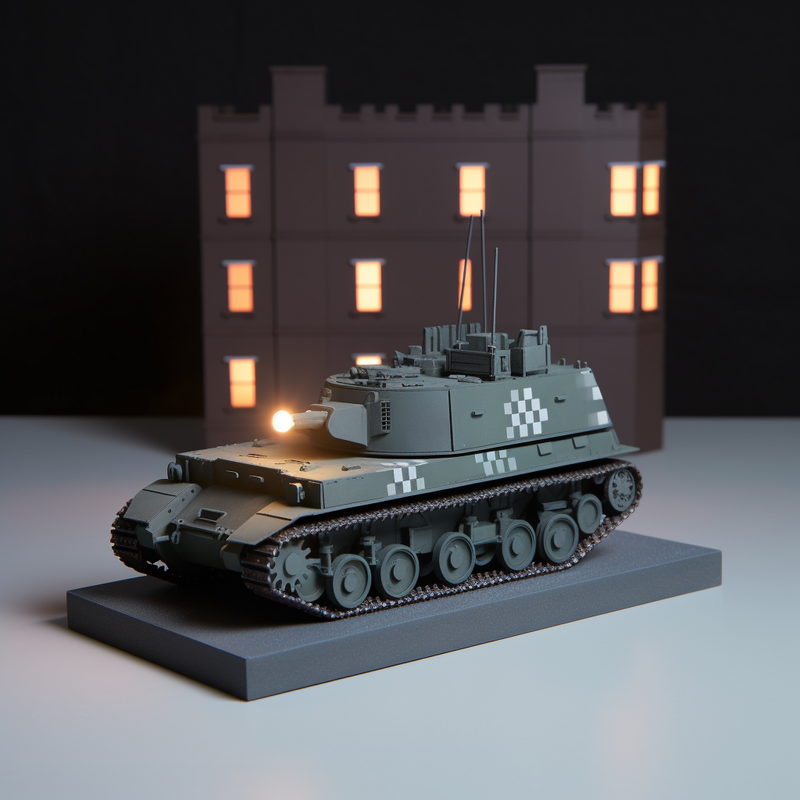
Adding LED lights to model kits is a crucial step in creating a truly outstanding and visually dynamic finished product. LED lights serve the purpose of injecting personality and enhancing the appearance of various model kits, such as Gunpla models.
The importance of integrating LED lights into model kits lies in the fact that they bring life to the static models. Through the use of LED lights, model kits transform from mere plastic representations of the subject into captivating displays of artistry. The addition of LED lights allows for the creation of captivating visual effects that elevate the overall appeal and impact of the model.
In the case of Gunpla models, LED lights can be strategically placed to make specific parts glow, such as the eyes, weapons, or backpack. This feature adds depth and realistic detail to the model, making it stand out as a stunning piece of work. The glowing parts create an illusion of vitality, giving the Gunpla model a sense of power and energy.
By incorporating LED lights into model kits, hobbyists have the ability to showcase their creativity and technical skills. They can experiment with different lighting arrangements and effects, adding a personal touch to their projects. LED lights provide a unique opportunity to make each model kit truly unique and customized, ensuring that no two creations are alike.
In conclusion, the importance of adding LED lights to model kits cannot be overstated. The use of LED lights injects personality, enhances the appearance, and allows for specific parts to glow, creating stunning visual effects. By incorporating LED lights into their projects, model kit enthusiasts have the power to bring their creations to life and showcase their artistic talents.
Introduction to Materials Needed:
In order to successfully complete a project or task, it is essential to have the necessary materials. Determining the materials needed beforehand can help streamline the process, ensure efficiency, and avoid delays or interruptions. Whether it is for a DIY home improvement project, a cooking recipe, or a school assignment, having the right materials can make all the difference in achieving the desired outcome. This article will explore the importance of identifying and gathering the materials needed and provide guidance on how to effectively plan for them. By understanding the significance of materials and planning ahead, individuals can enhance their productivity and ensure a smooth execution of their endeavors.
To complete the project, the following materials are required:
1. HGUC Moon Gundam: The main component of the project, this high-grade universal century model kit serves as the base for the customization process.
2. Vallejo Black Mecha Primer: This primer is essential for creating a smooth and even surface on the model kit before applying paint. It ensures that the paint adheres well and enhances its durability.
3. Tamiya Clear Green Acrylic Paint: This specific shade of acrylic paint is needed to achieve the desired color for the Moon Gundam. It provides a translucent green finish, adding a unique touch to the model kit.
4. Dremel: A versatile rotary tool, the Dremel is used to perform precision work such as drilling, sanding, and carving. It can be used to modify or customize certain parts of the Moon Gundam.
5. 1/32 Router Bit: This specific router bit is used with the Dremel for more intricate and detailed modifications. It allows for precise cuts and shaping of the model kit.
6. Mr. Hobby Chip LED: To add lighting effects to the Moon Gundam, a Mr. Hobby Chip LED is required. It provides a bright and vibrant light source that can be placed inside the model kit.
7. Mr. Hobby Battery Box: This battery box serves as the power source for the LED lights. It holds the batteries securely and provides an easy way to turn the lights on and off.
8. CA Glue: Also known as cyanoacrylate adhesive, CA glue is a fast-drying and strong adhesive that is used for bonding different parts of the model kit together.
9. BSI Instant Set: This accelerator is used in conjunction with CA glue to speed up the drying process. It ensures that the glued parts set quickly and securely.
10. Hobby Knife and Metal File: These tools are necessary for trimming and refining the model kit's parts. The hobby knife is used for precise cutting, while the metal file is used for smoothing and shaping rough edges.
In conclusion, the materials needed for this project include the HGUC Moon Gundam, Vallejo Black Mecha Primer, Tamiya Clear Green Acrylic Paint, Dremel, 1/32 Router Bit, Mr. Hobby Chip LED, Mr. Hobby Battery Box, CA glue, BSI Instant Set, hobby knife, and metal file. These materials are essential for achieving the desired customization and lighting effects on the Moon Gundam model kit.
The items in this build play a crucial role in enhancing the effectiveness and efficiency of the overall strategy. Each item serves a specific purpose and function to maximize the potential of the build.
1. Infinity Edge: The main component of this build, Infinity Edge, serves as the cornerstone item. It provides a significant increase in attack damage and critical strike chance, making it ideal for champions that rely on critical hits to deal massive damage. The purpose of Infinity Edge is to amplify the damage output of the champion, ensuring that each critical strike inflicts substantial harm to the opponents.
2. Phantom Dancer: Phantom Dancer complements the Infinity Edge by further increasing the champion's critical strike chance. Additionally, it provides attack speed and movement speed, allowing the champion to attack faster and maneuver more swiftly during confrontations. The item's role is to enhance the champion's damage potential and improve their survivability through increased mobility.
3. Bloodthirster: The Bloodthirster offers a significant amount of attack damage and life steal, making it a formidable asset in this build. Its function is to provide sustainability to the champion by restoring health with each successful attack, especially during prolonged engagements. The item's role is to ensure the champion remains in the fight, able to withstand damage and deliver consistent damage output.
4. Last Whisper: Last Whisper is a crucial item when facing opponents with high armor. It provides armor penetration, enabling the champion to bypass a significant portion of enemy armor and deal increased damage. The purpose of Last Whisper is to maximize the damage output of the champion against tanky opponents, ensuring that the build remains effective even against heavily armored enemies.
In summary, each item in this build has a specific role and purpose. The Infinity Edge amplifies damage output, the Phantom Dancer enhances damage potential and survivability, the Bloodthirster provides sustainability, and the Last Whisper maximizes damage against heavily armored foes. Together, they synergize to create a highly potent and efficient build capable of dealing massive damage in various situations.
Introduction:
When diving into the world of modeling, it is crucial to approach each project with meticulous planning and preparation. One of the first steps in the modeling process is to prepare the model kit. This involves gathering all the necessary tools and materials, checking the contents of the kit for any missing or damaged parts, and organizing the components for easy access and assembly. Properly preparing the model kit not only ensures a smoother construction process but also sets a solid foundation for achieving a high-quality end result. In the following sections, we will delve into the essential steps involved in preparing the model kit and explore the key considerations to keep in mind throughout the process. Whether you are an experienced modeler or just starting out, this guide will provide valuable insights to help you create stunning and accurate models. So, let's begin by understanding the fundamentals of preparing the model kit and set the stage for an exciting modeling journey.
When choosing a suitable model kit, there are several key factors that need to be considered. Firstly, it is important to consider the type of kit you are looking for. In this case, a DIY Designer Kit Technic is mentioned, so finding a model kit that aligns with this specific type is essential.
Secondly, the fact that the kit mentioned is discontinued also needs to be taken into account. This means that availability may be limited, so it is crucial to consider alternative options or sources where discontinued model kits can be found.
Thirdly, suitability is an important factor to consider. Each individual has different preferences and skill levels, so ensuring that the model kit is suitable for the person it is intended for is crucial.
Fourthly, the quality of the model kit is important. Researching reviews and feedback from other users can help in determining the quality and durability of the kit.
Lastly, the price of the model kit should be considered. Ensuring that the kit is within a reasonable budget is important.
Keywords: DIY Designer Kit Technic, discontinued, suitable, model kit, key factors.
Planning the placement of LED lights in a Gunpla kit is crucial to achieving the desired effect and ensuring that they are properly installed without damaging any clear Gunpla parts. The process involves careful consideration and strategic decision-making.
Firstly, it is important to study the Gunpla kit and identify areas where the LED lights can be placed. These areas could include the head, chest, backpack, or any other part of the model that has suitable space.
Next, the desired effect must be determined. Do you want the lights to simulate the glow of the eyes, replicate the thruster flames, or create a dynamic lighting feature? Understanding the desired effect will guide the placement of the LED lights.
Once the areas and the desired effect are established, the actual placement of the LED lights begins. It is crucial to ensure that the lights are properly installed without causing any damage to any clear Gunpla parts. This could involve drilling holes or creating gaps to accommodate the LED lights. It is also important to consider the power source and how it will be concealed within the model.
In conclusion, planning the placement of LED lights in a Gunpla kit is a meticulous process. By carefully considering the areas, desired effect, and installation techniques, one can enhance the overall visual appeal of the model without compromising its structural integrity.
Setting up the power source is an essential aspect of any project or device that requires electricity to function. Whether it is for a home, office, or any recreational activity, having a reliable power source is crucial. In this section, we will explore the necessary steps and considerations involved in setting up the power source. From understanding the power requirements and choosing the right power source to ensuring proper safety measures and connections, this guide aims to provide a comprehensive overview of the process. By following these instructions, individuals can ensure a seamless and efficient power supply that meets their needs while prioritizing safety and reliability.
There are several power sources that can be considered when planning a project. These sources can be classified into two main categories: fossil fuels and renewable sources.
In terms of fossil fuels, coal, natural gas, and oil are commonly used to generate power. Coal is a readily available and affordable option, but it contributes significantly to air pollution and greenhouse gas emissions. Natural gas emits fewer pollutants than coal but is still a non-renewable resource. Oil, on the other hand, is mainly used for transportation and has limited applications for power generation.
In contrast, renewable sources offer a more sustainable and environmentally friendly option. Solar power harnesses energy from the sun through the use of photovoltaic panels or concentrated solar power plants. Wind power utilizes wind turbines to convert wind energy into electrical power. Hydroelectric power relies on the force of flowing or falling water to generate electricity.
By considering these power sources, project planners can weigh the advantages and disadvantages of each option. Factors such as cost, environmental impact, availability, and feasibility need to be taken into account to determine the most suitable power source for the project at hand.
To connect a power source to LED lights, start by gathering the necessary materials, including the LED lights, a power source such as a battery or power supply, and wire strippers. First, identify the positive (+) and negative (-) terminals on both the power source and the LED lights. Next, strip a small section of insulation from both ends of the wire using the wire strippers.
To wire the LEDs in series, connect the positive terminal of one LED to the negative terminal of the next LED using the stripped wire. Repeat this process until all the LED lights are connected. Finally, connect the remaining positive and negative terminals to the power source.
Alternatively, to wire the LEDs in parallel, connect the positive terminal of each LED directly to the positive terminal of the power source, and likewise connect the negative terminals. This creates separate circuits for each LED, allowing independent operation.
Wiring LEDs in series has the advantage of requiring fewer power sources, making it useful when a limited number of power sources are available. On the other hand, wiring LEDs in parallel allows for independent operation and offers redundancy in case one LED malfunctions.
When wiring LEDs in parallel, it is important to use resistors to regulate the current flow and prevent damage to the LEDs. Additionally, ensure that the power source can handle the combined current of all the LEDs. Take precautions to avoid short circuits and ensure that all connections are securely tightened.
In summary, connecting a power source to LED lights involves identifying the terminals, wiring the LEDs in series or parallel, considering the advantages of each method, and taking necessary precautions to ensure proper functioning and safety.
Introduction:
Wiring and resistor installation are two critical aspects of electrical systems that ensure proper functioning and safety. Wiring refers to the process of connecting electrical components and devices using conductive materials, allowing the flow of electric current. It plays an essential role in powering different electrical systems, such as lighting, appliances, and machinery. On the other hand, resistor installation involves incorporating resistors into an electrical circuit to regulate the flow of current or to modify voltage levels. Resistors are passive electronic components that offer resistance to the flow of electric current, and they are employed for various purposes, including voltage division, current limiting, and signal conditioning. Understanding the fundamentals of wiring and resistor installation is crucial for anyone involved in electrical maintenance, repair, or construction, ensuring optimal performance and adherence to safety standards.
Understanding Ohm resistors and their importance is crucial in electronic circuits, especially in a Makey Makey circuit. Ohm resistors, named after the German physicist Georg Simon Ohm, are electronic components that limit the flow of electric current in a circuit. They play a vital role in preventing other components, such as LEDs, from blowing out due to excess current.
In a Makey Makey circuit, Ohm resistors are strategically placed to limit the current flowing through the LED. This prevents the LED from receiving more current than it can handle, which could lead to overheating and ultimately blowing out. By adding an Ohm resistor in series with the LED, the resistance value can be adjusted to ensure that an appropriate amount of current flows through the LED, making it safe to use.
Determining the resistance value of the Ohm resistor can be done using Ohm's Law. Ohm's Law states that the current flowing through a conductor is directly proportional to the voltage applied and inversely proportional to the resistance. By knowing the desired current and the voltage across the LED, the resistance value of the Ohm resistor can be calculated using the formula R = V/I, where R is the resistance, V is the voltage, and I is the current.
In conclusion, Ohm resistors are essential in electronic circuits, such as Makey Makey circuits, to prevent components like LEDs from blowing out due to excess current. Understanding the importance of Ohm resistors and utilizing Ohm's Law to determine the resistance value is vital in creating safe and functional electronic circuits.
Proper wiring techniques for LED lights are crucial to ensure their safe and efficient operation. When wiring LED lights, there are two common methods: series and parallel.
Wiring in series involves connecting the positive terminal of one LED to the negative terminal of the next LED. This creates a single pathway for the current to flow through all the LEDs. In a series circuit, the voltage is evenly distributed among the LEDs. For example, if you have three LEDs in series and a power supply of 9 volts, each LED will receive 3 volts.
On the other hand, wiring in parallel involves connecting the positive terminals of all the LEDs together, and similarly, connecting the negative terminals together. This results in multiple pathways for the current to flow. In a parallel circuit, each LED receives the same voltage as the power supply. If you have three LEDs in parallel and a power supply of 9 volts, all three LEDs will receive the full 9 volts.
To ensure appropriate resistance for the LEDs, resistors are necessary. When wiring resistors in series, simply connect them end-to-end. The total resistance is the sum of the individual resistors. Wiring resistors in parallel involves connecting one end of each resistor together and the other end together. The total resistance can be calculated using the formula: 1/Rtotal = 1/R1 + 1/R2 + 1/R3 + ... + 1/Rn, where R1, R2, R3, etc., are the resistances of the individual resistors.
By understanding the concepts of series and parallel wiring and the appropriate use of resistors, one can achieve optimal wiring techniques for LED lights, ensuring their longevity and proper functioning.
Installing light strips in Lego sets or Mocs is a popular way to add custom lighting effects and enhance the overall appearance of the models. This step plays a crucial role in bringing the creations to life and adding a unique touch to them.
To complete the installation, there are a few materials and tools that are necessary. First and foremost, you will need light strips specifically designed for Lego sets or Mocs. These can be purchased from specialty stores or online retailers. Additionally, a soldering gun is required to connect the light strips to the power source. This allows for a secure and stable connection. A hot glue gun is also necessary to keep the light strips in place, ensuring they do not move or detach during handling.
By installing light strips, you can achieve various custom lighting effects, such as illuminating windows, highlighting specific areas, or creating a vibrant ambiance. This not only adds visual interest but also brings the models closer to their real-life counterparts. The enhanced appearance created by the lighting effects elevates the overall quality and realism of the Lego sets or Mocs.
In conclusion, installing light strips is an essential step in adding custom lighting effects and enhancing the appearance of Lego sets or Mocs. The necessary materials and tools, such as light strips, soldering gun, and hot glue gun, allow for a successful installation. By incorporating these lighting effects, Lego enthusiasts can create captivating and imaginative displays.
 Author: Alex Wood